Diy Cookie Shot Glasses For Christmas
Diy Cookie Shot Glasses For Christmas

The thing is, I’ve seen cookie shot glasses before. For example, Shari at Whisk made some gingerbread ones back in 2008, and there’s a tumblr called Shotibles that features several of them (although it hasn’t been updated in about a year and the associated blog has shut down, so there are no instructions or recipes). I have no doubt there are more – that’s just what I found with a quick search. I’m not sure what’s so revolutionary about these, except maybe the fact that they’re chocolate chip cookies. I mean don’t get me wrong, I’m sure Ansel’s version is amazing and I would love the chance to try one (I read something about gooey Valrhona chocolate chunks and vanilla-infused whole milk), but the shot glass concept itself isn’t new.
The best dough for something like this is obviously one that doesn’t spread or distort as it bakes, right? Have we all seen that cookie bowl fail? That’s what happens when you use the wrong dough. A cookie cutter dough should be ideal, but I’ve never seen roll-out chocolate chip cookies before. Google? Oh look, SweetSugarBelle posted a recipe in 2011. Sounds like a great starting point!


Next, some sort of mould to bake them in. Shari recommended using an oven-safe shot glass. I know I’ve seen stainless steel shot glasses before, but could I find any? No, of course not. I did, however, find some rum baba moulds (both tall & thin and short & wider) that looked like they’d do the trick. I bought one of each just to do some testing. A popover pan looks like it should also probably work – the cups would be slightly larger than a shot glass, but that could be a good thing.
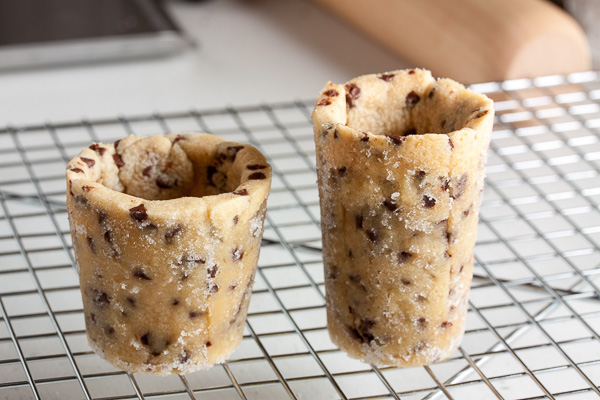
Shari formed the cookie inside the mould, and based on the photos I’ve seen, so did Dominique Ansel. I actually tried to do one formed on the outside just to see how it would look, but it just fell apart and it’s best to forget about that attempt altogether. Plus by forming the cup on the inside of the mould, the outside of the cookie has a clearly defined shape and a smooth flat bottom. If the inside is a bit misshapen? No one will know.

I brushed the insides of the moulds with shortening and then sugared them as well. Next time I’ll skip the sugar, or maybe just use it on the bottom, because the finished cookie came out with a bit of a sugar crust. Not quite the look I was going for.

I used a small circle cookie cutter to create a shape for the bottom of the cookie and dropped that into the mould. For the sides, my first thought was to cut a rectangle of dough and form it into a cylinder to put into the mould. But the dough cracked and broke when I tried to curl it. So what I ended up doing was cutting that rectangle into strips and then pressing them into the mould one-at-a-time, ensuring there was some overlap with each other and the bottom circle to create a good seal.

I made one cup using each of the two moulds, and then I got fancy and used them together as a 2-piece mould to give it a more finished appearance both inside and out – with the cookie inside the shorter mould and the taller mould inside the cookie. In the end, it didn’t make much difference other than needing more baking time. So don’t worry about trying anything like that. Just forming the cookie inside a mould is sufficient.
The cup shapes needed a longer baking time than a regular cookie. Since I only made a few sample cups this time around, I cut the rest of the dough with a cookie cutter and baked them up as regular cookies. Those took about 12 minutes, but I didn’t feel like the cups were done until almost 17 minutes. The bottom of the cup puffed up a bit in the oven, so I flattened it back out before it cooled completely. The mould retained a lot of heat, and it was about 15 minutes before they were cool enough to get the cookie out. And then they came out fairly easily – I just had to pat the bottom a few times and the cookie popped right out. Other than the aforementioned sugar crust, I think they turned out great!

The real test, however, was would they hold milk? Sadly, no. They leaked. Shari suggested putting them in the freezer to help prevent leakage, but I didn’t want to eat a frozen cookie. So instead I melted some chocolate and applied it to the inside to create an inner chocolate lining. I’ve seen that trick used before with cookie bowls. More chocolate? Bring it on! And it did the trick. Success! I now have (semi) perfect little shot glasses that will hold milk. Yay!
And check this out. I did some more googling after I made my cookies and found additional photos of Ansel’s version of the shot glass. In these, you can tell that he lined them with chocolate as well. Aha! (Update: On further reading, I’ve learned that Ansel’s cookie shots are served warm, and that they’ve switched from a chocolate lining to a heat-resistant glaze as the chocolate lining melted when the cookie was heated.)
So, verdict? These aren’t that difficult to make at all. You just need a good non-spreading cookie dough and some chocolate to coat the insides. And because of the longer baking and cooling times, you’ll definitely want more than just a couple moulds to work with. Yes, mine are a bit wonky looking. But you can learn from my mistakes and yours will be so much prettier. So get out there and bake some cookies!

Cookie Shot Glasses
I’m guessing this will work with any good cookie cutter dough. If you want to try something other than the chocolate-chip cookie recipe, check out these recipes for sugar cookies, chocolate-ginger cookies, and my favourite gingerbread. Otherwise, I would definitely recommend this chocolate chip cookie recipe. They’re a bit crunchy but still soft – almost like a shortbread studded with tiny chocolate chips. A perfect cookie to dunk in milk, or fill with milk! (or Baileys, I won’t judge)
ingredients
1 cup unsalted butter, at room temperature
1/3 cup granulated sugar
1/2 cup light brown sugar
1 large egg yolk
2 teaspoons pure vanilla extract
2-1/2 cups all-purpose flour
1/2 teaspoon salt
1-1/2 cups semi-sweet mini chocolate chips (I thought this was too much for the shot glasses and just used 1 cup – still plenty of chocolate chips in there!)
additional requirements
oven-safe moulds, such as stainless steel shot glasses, rum baba moulds (tall & thin or short & wider), or a popover pan
chocolate to coat the insides of the cups (dark, milk, or white – your preference)
preparing the dough
In a medium bowl, whisk together the flour and salt. Set aside.
In the bowl of a stand mixer fitted with the paddle attachment, beat the butter and sugars together on medium speed until light and fluffy, about 3 or 4 minutes. Scrape down the sides of the bowl and add the egg yolk and vanilla and beat to incorporate.
Turn the mixer down to low and add the dry ingredients, mixing until just barely combined. Remove from the mixer and knead in the mini chocolate chips by hand to ensure they’re distributed evenly.
Divide the dough into 2 portions. Roll each portion out onto a piece of parchment or wax paper to just shy of 1/4″ thickness (I used a 3/16″ guide). Stack the 2 pieces (paper included) onto a baking sheet and refrigerate for at least 30 minutes (I let them chill overnight).
assembling the cookies
When ready to bake, preheat the oven to 350°F.
Prepare your moulds by brushing the insides with shortening.
Remove one of the dough pieces from the fridge at a time (keeping the dough chilled will help prevent spreading in the oven). Use a small circle cookie cutter to create a shape for the bottom of the cup. Then cut out multiple strips slightly more than the height of your mould to create the sides.
Drop the cut-out circle into the bottom of your mould, and then press the strips into the mould, along the sides, slightly overlapping the bottom to create a seal. Continue adding strips and pressing them together, working your way around the mould until you’ve created a complete cup shape.
Place your moulds on a baking sheet and bake for a few minutes longer than whatever your original recipe calls for – in this case, about 13-17 minutes. Keep an eye on them – they will begin to brown around the top edge when they’re done. Be sure not to underbake these – you want a sturdy cookie to hold your milk.
Remove from the oven and place the moulds on a cooling rack. When they’re cool enough to handle, turn the moulds upside down and pat the bottom a few times to get the cookie to drop out. You may need to squeeze the sides a bit to get the cookie to loosen.
finishing the cups
Gently melt the chocolate in a small microwave safe bowl or on top of a double boiler, stirring often so it doesn’t scorch.
Working with one cookie cup at a time, pour in a small amount of the melted chocolate. Immediately, swirl the chocolate around a bit and pour out the excess – you don’t need a thick layer of chocolate, and a thinner coat will dry quicker. It doesn’t matter at this point if the sides are completely coated – this is mostly to ensure the bottom has a good seal. If the sides are coated? Great, you’re done! If not, use a butter knife to apply a small amount of chocolate at a time to completely coat the sides. Again, you don’t need a thick coat, but you do want to make sure there isn’t any cookie exposed.
Allow the chocolate to dry completely before filling the cups with liquid.