Flooring Finesse: Tips and Tricks for the Perfect Floor Tile Installation
Transforming your home’s interior can be as simple as revamping the floor. Tiles offer a stunning and versatile solution with their endless variety of colours, textures, and patterns. However, achieving a flawless installation requires more than picking the perfect tile. It’s about meticulous preparation, precise execution, and clever know-how. So, before you embark on your tile-tastic journey, let’s delve into some essential tips and tricks to ensure your floor becomes a masterpiece of Elegance Tiles Melbourne.
Laying the Groundwork: Preparation is Key
A successful tile installation hinges on a well-prepared subfloor. Here’s how to get it right:
- Subfloor assessment: Ensure your subfloor is level, dry, and free of cracks or imperfections. Unevenness can lead to tile cracking and grout problems. For wooden subfloors, check for moisture and warping.
- Moisture matters: Moisture can wreak havoc on tiles and adhesives. Fix any leaks and ensure proper ventilation to prevent moisture buildup. Use moisture-resistant materials like cement backer boards for moisture-prone areas like bathrooms.
- Marking the masterpiece: Plan your tile layout. Mark the starting point and reference lines for a straight and even installation. Use a laser level for precision.
Tiling Techniques: Master the Craft
Now, let’s get down to the nitty-gritty of tile placement:
- Adhesive application: Choose the right adhesive for your tile type and subfloor. Apply the adhesive evenly using a notched trowel, ensuring proper coverage.
- Laying the foundation: Start with whole tiles from the reference lines outwards. Use spacers to maintain consistent grout lines. Work in manageable sections to avoid adhesive drying prematurely.
- Cutting for perfection: Use a wet saw or tile nippers for precise cuts around corners and obstacles. Mark your cuts accurately to minimise waste.
Grouting Genius: The Finishing Touch
Grouting fills the gaps between tiles, adding both aesthetics and functionality. Here’s how to grout like a pro:
- Mixing matters: Follow the grout manufacturer’s instructions for mixing the grout. Use clean water and the correct powder ratio to water to achieve the right consistency.
- Squeegee with finesse: Apply the grout using a rubber grout float, working diagonally across the tiles. Fill the joints, removing excess grout with the float.
- Cleaning up: Once the grout is firm, wipe the tile surface with a damp sponge to remove excess grout haze. Rinse the sponge frequently and change the water often for best results.

Pro Tips for Extra Finesse
Elevate your tile installation with these insider secrets:
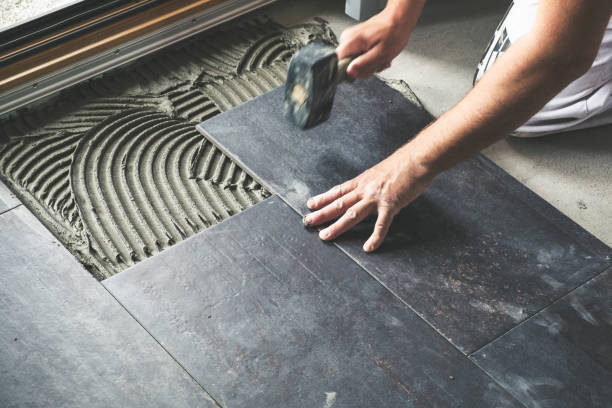
- Use a tapping block: After laying each tile, gently tap it with a rubber mallet to ensure good adhesion and prevent air pockets.
- Seal the deal: Sealing your tiles protects them from stains and moisture. Choose a sealant appropriate for your tile type and desired finish.
- Maintenance magic: Regular cleaning and maintenance are crucial for keeping your tiles looking their best. Use gentle cleaners and avoid harsh chemicals.
Conclusion: Stepping into Elegance
With careful planning, meticulous execution, and these handy tips, you’re well on your way to achieving a flawless tile installation. Remember, a little preparation and a touch of finesse can transform your home with tiles’ timeless elegance. So, grab your tools, unleash your creativity, and step into a world of flooring finesse!
And for those seeking the finest selection of tiles in Melbourne, look no further than Elegance Tiles Melbourne. Their extensive range of high-quality tiles, expert advice, and exceptional customer service make them the perfect partner for your tile transformation journey.